For this guide I will be building a standard 8 page website, which will retail at £25 per month. 3 of these pages will be standard pages, Home, About Us & Contact Us, the other 5 pages will be supplied by the client.
In this Design Guide I will be using a website which we have setup already called, TD Autos (
www.tdautos.co.uk).
Stage 1: Design Restrictions
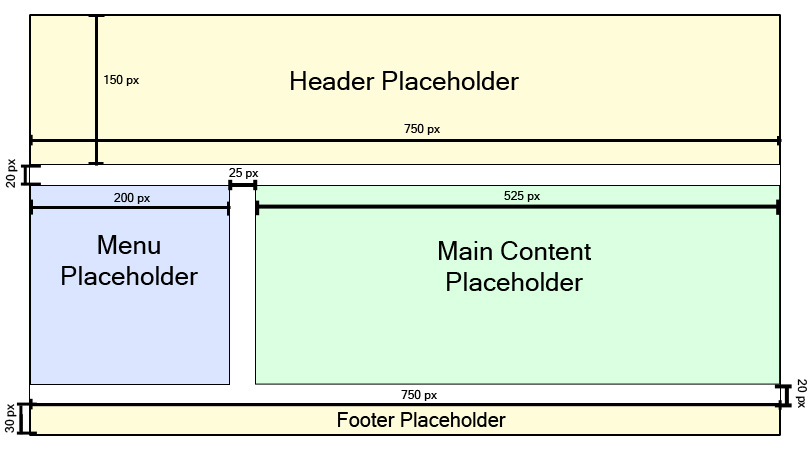
As part of being a Franchisee you will received a CD which contains PSD to our WebsiteTemapltes. In this guide we will be looking at WebsiteTemplateA, which follows the following design layout:-
(Click on image to show the full version)
As you can see the whole width of the page is fixed to 750 pixels, the menu width is 200 pixels, the content frame is 525 pixels, with a 25 pixel border between the menu and the main content frame.
Key points to bare-in-mind, before you start designing:-
- Where your main content will go, this area will grow and shrink with the amount of data, so don't used complex images for the background of this section
- Each menu item will have the same style applied to each button, therefore you will only need to design 1 button.
- The provided templates follow these design restrictions, it is possible to ignore these design restrictions but this is not covered within this tutorial.
- If you require text placeholder, i.e. menu text or some demo content text, you can put it in during the design stage, but before you slice your image disable this text, but making it invisible in Photoshop.
- Do not destory the sliced area's, as these will be required for the next stage.
Now you know you these restrictions, go ahead an open one of the provided templates and design yourself a new website.
Stage 2: Slicing the website template in Photoshop
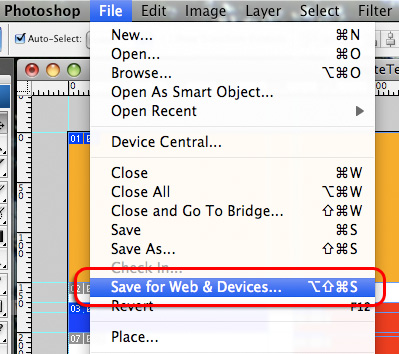
So now you should have your completed PSD of your new website which is ready to be sliced up for the web. To initiate the slicing processes within Photoshop, click on "File" and then select "Save for Web & Devices....":-
Once you have clicked this menu item you should see something similar to the following:-
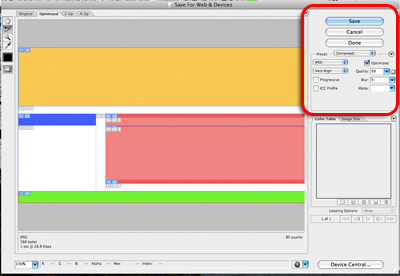
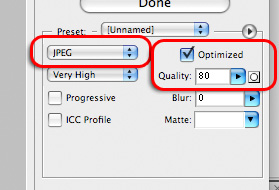
The main part of this screen we are interested in is the right hand panel underneath the 3 buttons, make sure the following items are done:-
- "JPEG" is selected from drop down list
- "Optimized checkbox is checked
- & that the quality is set to 80
Similar to this:-
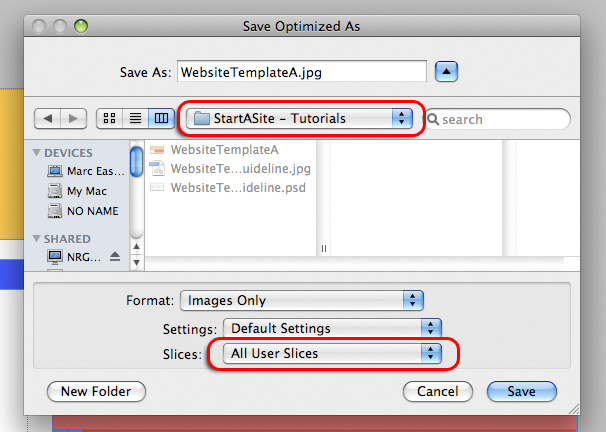
Next click on the button "Save", which is located on the top right hand side of this screen.
Before you click save you must navigate to the appropriate folder, or create a new folder. As this is where you sliced images are going to be saved to. Make sure that the "Slices" drop down box reads "All Users Slices", as we are not interested in the automatically created slices and that the "Settings" drop down box reads "Default Settings":-
Now you have successfully sliced up your PSD design, which is now ready to be uploaded to the website.
Stage 3: Create the Cascading Style Sheet in StartASite 3.0
For each site you create a different cascading style sheet (CSS) will be used. To create a new CSS for this site, login into StartASite Administration Section for this current site, this can be done by appending "admin" onto the end of the url, so for example:-
http://www.tdautos.co.uk's Administration Section would be
http://www.tdautos.co.uk/admin
Now login using your Franchisee's Username and Password.
Once in, click on "Style Sheet Management".
Now click on "Create A New Style Sheet"
You will be asked what Template do you wan this cascading style sheet to be based on, for this example we have used "TemplateA", but if you have based you design on something different, select it from the drop down box.
Now click on "Create" to create and configure this new Style Sheet.
This newly created cascading style sheet will not set as the default style, to set it as the default click on "Set As Default"
Stage 4: Uploading the images
For this stage you will need a FTP Client, this allows you to upload your images to your site.
Windows Users, please download SmartFTP from http://www.smartftp.com/
Mac OS X User, please download CyberDuck from http://cyberduck.ch/
Both of these applications are free, if you currently already have a FTP client installed then it is perfectly fine for you to use that.
The FTP Details you need to use are the following:-
Host: The website you are creating this design for, so for this guide it would be "tdautos.co.uk"
Username: Your main Franchisee Username
Password: Your main Franchisee Password
In this example I will be using CyberDuck, but the steps will be the same for any other FTP Client.
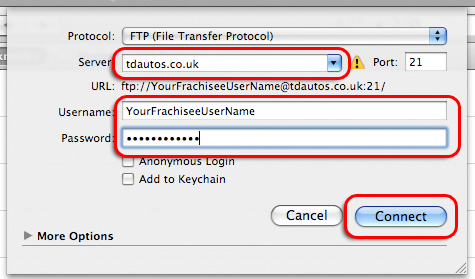
Connect to the website, via FTP. Enter details and click on "Connect":-
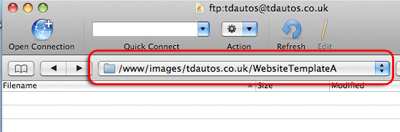
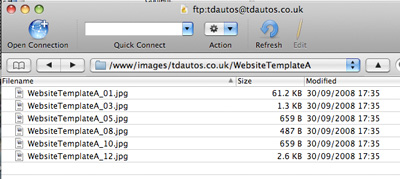
Navigate to the images for "WebsiteTemplateA" folder
"www/images//WebsiteTemplateA", so in this example I would navigate to "www/images/tdautos.co.uk/WebsiteTemplateA"
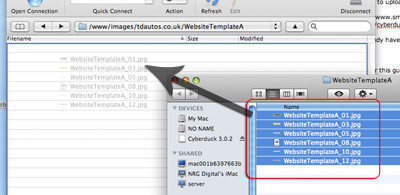
Drag your images overs
Just Drag & Drop your images, and they should be uploaded to the server.
Once you can see your uploaded files on the server...
Close the FTP Program.
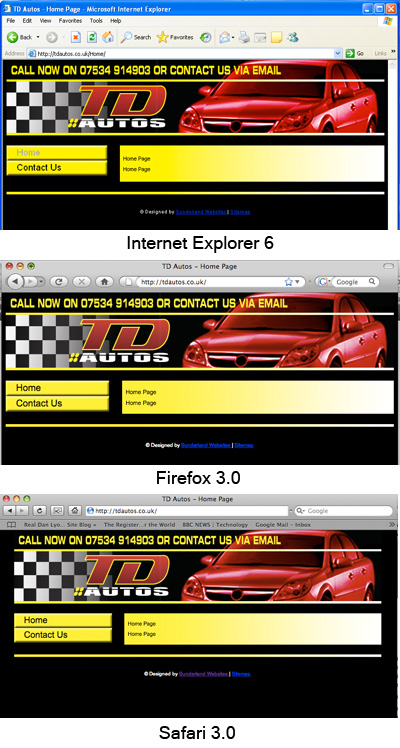
Stage 5: Testing
Testing your newly created Style Sheet can be done by loading up the website you are working on in your web browser. There are many different web browsers on the market, so it is best for you to test your clients website out in the top 3, which are:- Internet Explorer (6 & 7), Firefox & Safari.
In the unlikely event that you are having trouble with one of the StartASite 3.0 templates, please contact us and we will assist you.
Stage 6: Adjusting the Cascading Style Sheet template
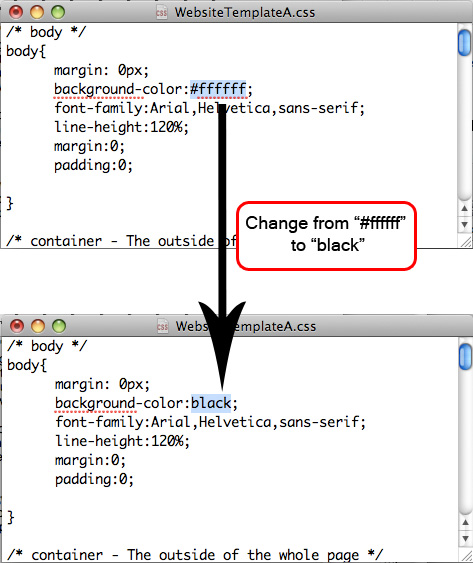
All the website templates have a white background, but as you can see tdautos.co.uk has a black background. In this stage I will show you how I have adjusted the cascading sheet style to make the background of this website black.
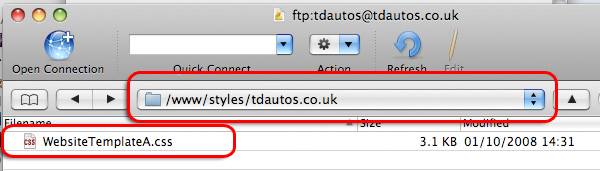
For this stage you will need yo load up your FTP Client and login, details on this step can be found in
Stage 4. Once you have connected, you need to navigate to where the "WebsiteTemplateA.css" is located:-
"www/styles//", so in this example I would navigate to
"www/styles/
tdautos.co.uk/"
Now drag this file to your Desktop, and open it up in Notepad (Windows) or TexEditor (Mac OS X). Somewhere near the top of the text file you should see the text "body{", on the line below it should see the words "background-color:#ffffff;". After the colon replace the '#ffffff' with the colour you wish to use as the background. All colours on the web are in a hexadecimal format, but you still can use a limit range of colours using just words. So for example black in hexadecimal is "#000000" or you can use the word "black":-
After any changes to a cascading style sheet you must test these changes, see
Stage 5.
Now that you have got your clients design complete, now you can starting adding the content.