Sequence (External)
If you are looking for the internal sequence, it is located here.
Once the franchisee has signed up, a NRG Digital representative will start the internal set up sequence in which you will receive your StartASite login details, this will allow you to visit our Franchisee Section on startasite.co.uk. This process could take up to 4-5 weeks to complete.
For each website you will be creating there are 3 main stages it must complete:-
Stage 1: Creating a Website
Creating a website using StartASite could not be easier, open
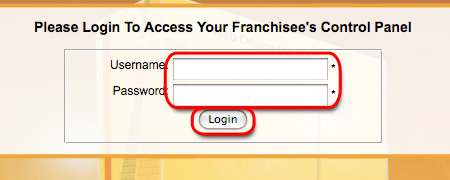
https://www.startasite.co.uk/franchise/ and enter the login details which you have received in your welcoming pack, which you will receive via electronic mail:-
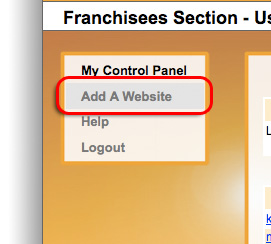
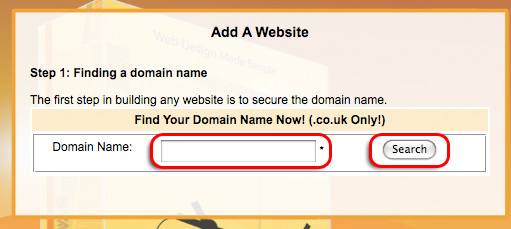
Once you are logged in you will be taken to your User Control Panel screen. On the left hand side click on the menu item which reads "Add A Website" :-
The first thing in creating any website is to register the domain name, this can be done by using our website domain name checker. If the website name you wanted is not available, try different variations on the name, this can be done by using hyphen's ('-') or by using abbreviations.
If the website name you have entered is taken, you can find out who it is registered to, by clicking on the "Whois Check" link:-
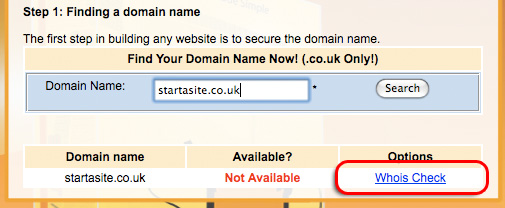
Once you have found the right website name which is available, click on the "Buy Domain" link next to it:-
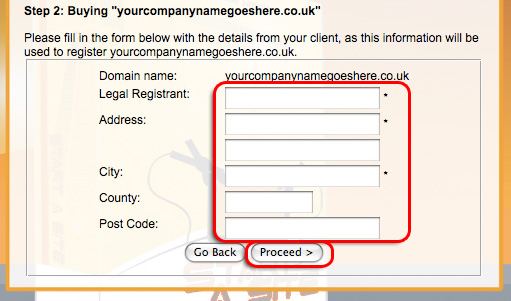
On this page you are required to enter the legal registrant's details (in most case's this will be your client's name and address), and then click on "Proceed >":-
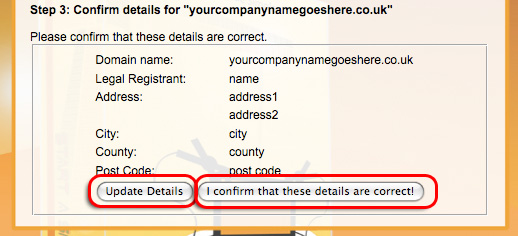
On the next screen you will be asked to confirm the details you have entered, if you have made any mistakes it is possible to go back and re-enter them. Once you are happy that the entered details are correct, click on "I confirm that these details are correct!" button:-
Next our system will notifiy us and a NRG Digital representative will contact you via telephone to take the payment of £25 + VAT.
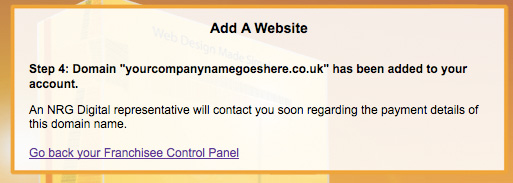
The £25 + VAT is a biannual charge, this is a little bit more than the cost a domain name because we also configure and setup the domain name for you, so you can get started to customise the site using StartASite Version 3.0. This also covers the cost of setting up 1 email account, by default this email account is "info@....", but if you wish to change this make sure you notify the NRG Representative when the payment is taken.
We accept the following cards:-

Within a couple of days you will receive an email similar to the one below, which contains details on your customers newly created website. The details which will be contained in this email are the following:-
- Administration Link
- Your customer's Username and Password
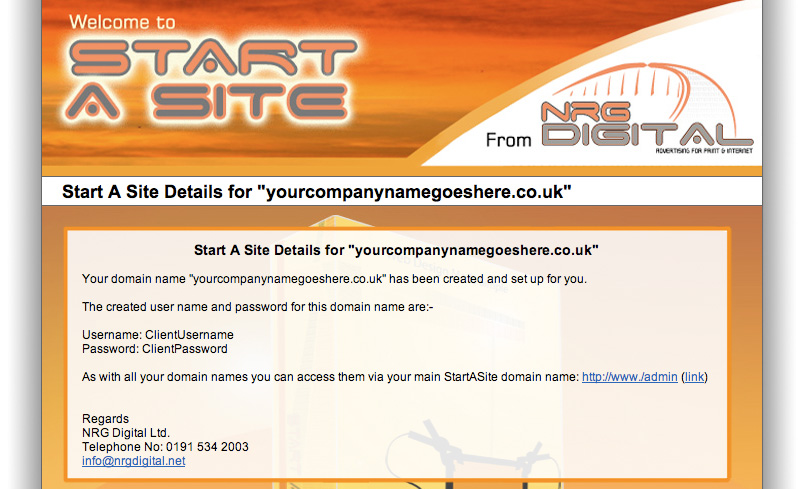
Now you are able to log into the newly created website using YOUR USERNAME AND PASSWORD (do not using the client's username and password, as you will not be able to add/edit/delete styles/modules/etc.)
Stage 2: Logging into your site
In addition to logging directly into the Admin of your new site, you can access the Administration section of your new web site via the Franchise Section.
What you need to do is log into the Franchise section (as shown above), and you should see a page similar to the following:-
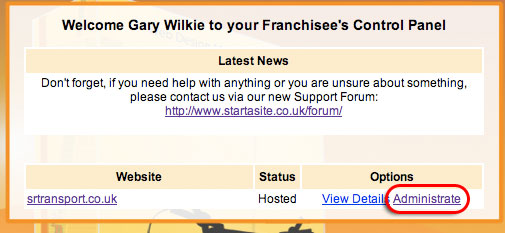
Now click on "Administrate" and a new window should appear, which is the administration section of your newly created website. It should look something similar to :-
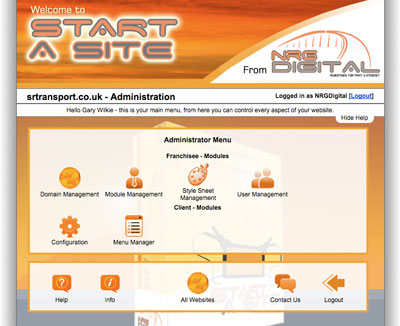
Once you have logged in the first thing you should do is it to configure this new website, this can be done by going in to the "Configuration Manager".
Within this section you can customise the site name, meta key words and description (meta keywords and description are what is read by search engines which visit your website).
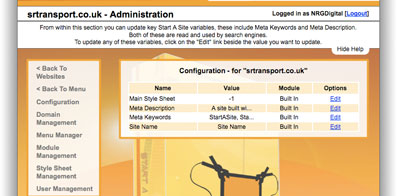
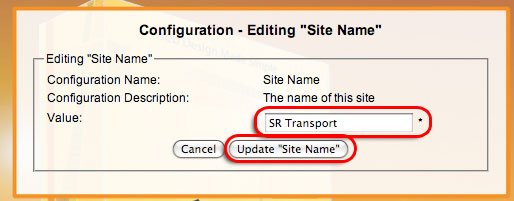
To change the site name, click on the Edit link next on the row which is named "Site Name":
Now you can update the site name configuration value to, once you are happy with it click on "Update "Site Name"":-
Now you can configuration all the values you require, this should include the Meta Keywords and Meta Description, as these are read by search engines and they effect your page ranking.
Once you have configured all of these parameters the next step is to Design the Look of the website.
Stage 3: Designing the Look
Within this section we will cover the following design stages:-
For this guide I will be building a standard 8 page website, which will retail at £25 per month. 3 of these pages will be standard pages, Home, About Us & Contact Us, the other 5 pages will be supplied by the client.
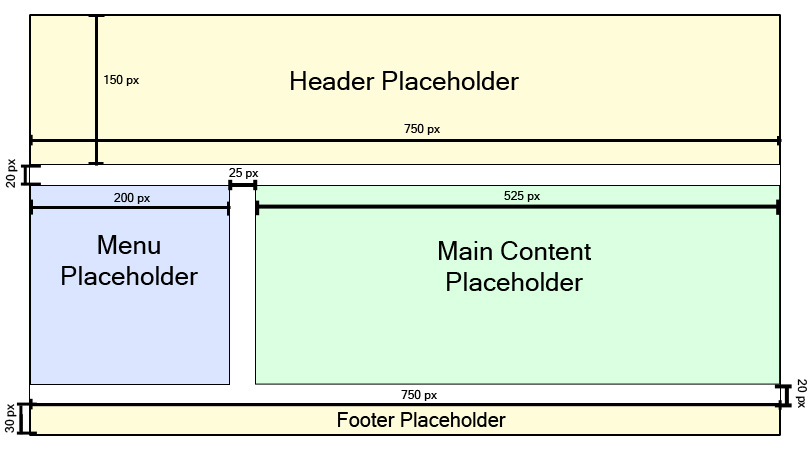
(Click on image to show the full version)
As you can see the whole width of the page is fixed to 750 pixels, the menu width is 200 pixels, the content frame is 525 pixels, with a 25 pixel border between the menu and the main content frame.
Key points to bare-in-mind, before you start designing:-
- Where your main content will go, this area will grow and shrink with the amount of data, so don't used complex images for the background of this section
- Each menu item will have the same style applied to each button, therefore you will only need to design 1 button.
- The provided templates follow these design restrictions, it is possible to ignore these design restrictions but this is not covered within this tutorial.
- If you require text placeholder's within your PSD, i.e. menu text or some demo content text, you can put it in during the design stage, but before you slice your PSD up, disable the text, but making it invisible in Photoshop.
- Do not destory/change the defined sliced area's within the template PSD, as these are required.
Now you know you these restrictions, go ahead an open one of the provided templates and design yourself a new website.
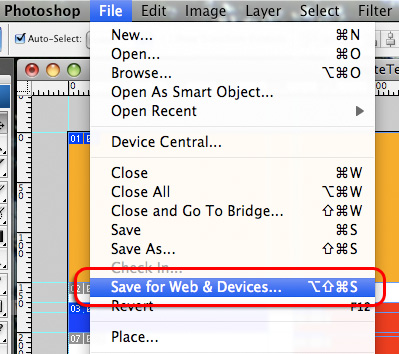
Step 2: Slicing the website template in Photoshop
Now you should have your completed PSD of your customers website which is ready to be sliced up for the web. To initiate the slicing processes within Photoshop, click on "File" and then select "Save for Web & Devices....":-
Once you have clicked this menu item you should see something similar to the following:-
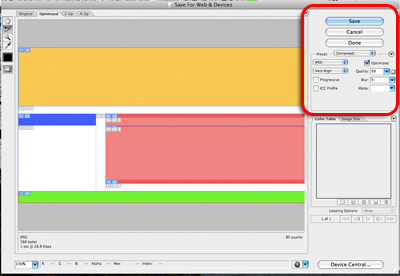
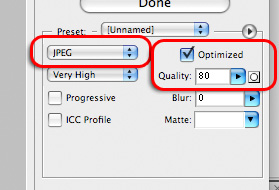
The main part of this screen we are interested in is the right hand panel underneath the 3 buttons, make sure the following items are completed:-
- "JPEG" is selected from drop down list
- "Optimized checkbox is checked
- & that the quality is set to 80
Similar to this:-
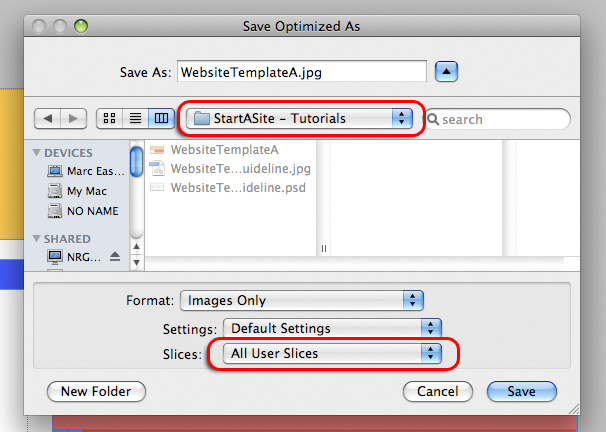
Next click on the button "Save", which is located on the top right hand side of this screen.
Before you click save you must navigate to the appropriate folder, or create a new folder. As this is where you sliced images are going to be saved to. Make sure that the "Slices" drop down box reads "All Users Slices", as we are not interested in the automatically created slices and that the "Settings" drop down box reads "Default Settings":-
Now you have successfully sliced up your PSD design, which is now ready to be uploaded to the website.
Step 3: Create the Cascading Style Sheet in StartASite 3.0
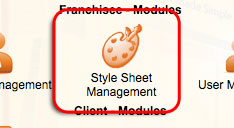
For each site you will need to create a different cascading style sheet (CSS). To create a new CSS for this site, login into the Administration Section for this web site, to do this please refer to
Stage 2: Logging into your website. Once you are logged in, click on "Style Sheet Management":-
Now click on "Add a Style Sheet" :-
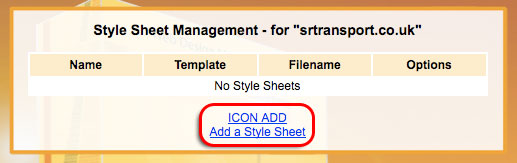
You will be asked what Template do you want this cascading style sheet to be based on, for this example we have used "WebsiteTemplateA", but if you have based you design on something different, select it from the list, and making sure you have filled in the require fields:-
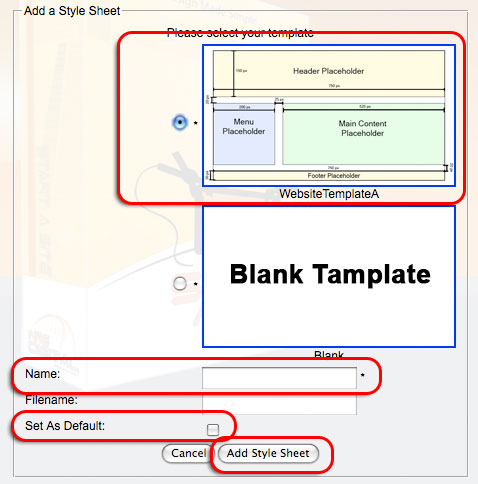
Now click the button that reads on "Add Style Sheet" to create and configure this new Style Sheet.
Step 4: Uploading the images
For this stage you will need a FTP Client, this allows you to upload your images to your site.
Windows Users, please download CoreFTP from http://www.coreftp.com/
Mac OS X User, please download CyberDuck from http://cyberduck.ch/
Both of these applications are free, if you currently already have a FTP client installed then it is perfectly fine for you to use that.
The FTP Details you need to use are the following:-
- Host: The website you are creating this design for, so for this guide it would be "tdautos.co.uk"
- Username: Your main Franchisee Username
- Password: Your main Franchisee Password
- if you have been given some custom FTP details, please use them.
In this example I will be using both CureFTP & CyberDuck, but the steps will be the same for any other FTP Client.
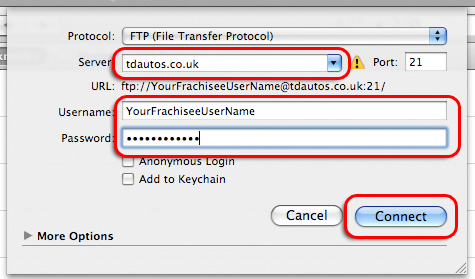
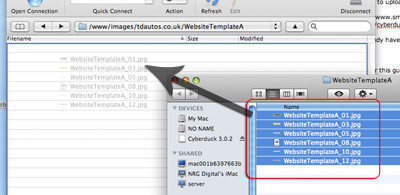
CyberDuck:
Connect to the website, via FTP. Enter details and click on "Connect":-
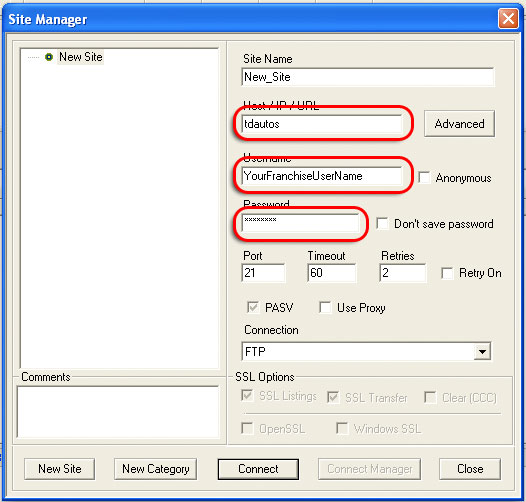
CoreFTP:
When CoreFTP loads you will be shown the connect to FTP screen, enter your domain name, your ftp username and ftp password and click Connect. Similar to the screenshot below:-
CyberDuck & CoreFTP:-
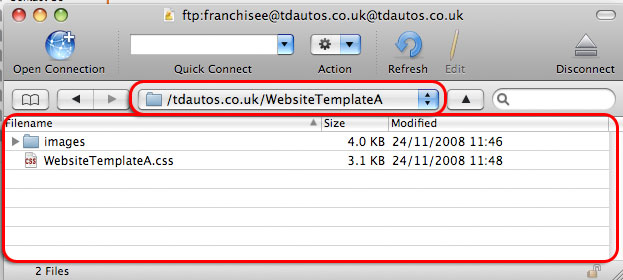
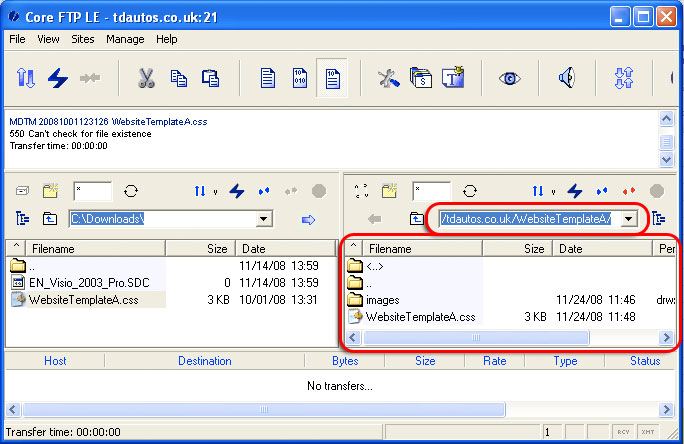
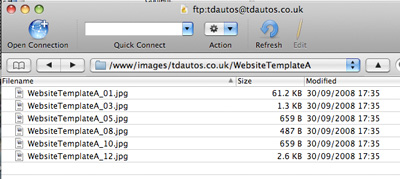
Navigate to the images for within your client domain name folder
"/", so in this example I would navigate to "tdautos.co.uk/WebsiteTemplateA"
As you can see there is a .css file and a folder called images, place your images within the "images" folder. This is possible by dargging and dropping your images into the "images" folder.
Once you can see your uploaded files on the server...
Close the FTP Program.
Step 5: Testing
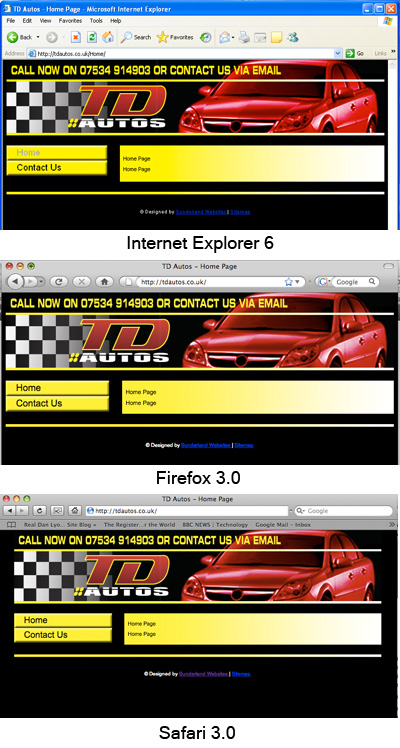
Testing your newly created Style Sheet can be done by loading up the website you are working on in your web browser. There are many different web browsers on the market, so it is best for you to test your clients website out in the top 3, which are:- Internet Explorer (6 & 7), Firefox & Safari.
In the unlikely event that you are having trouble with one of the StartASite 3.0 templates, please contact us and we will assist you.
Step 6: Adjusting the Cascading Style Sheet template
All the website templates have a white background by default, but as you can see tdautos.co.uk has a black background. In this stage I will show you how I have adjusted the cascading sheet style to make the background of this website black.
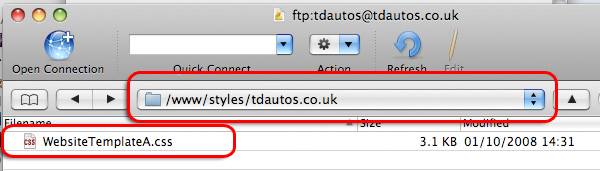
To do this you will need to load up your FTP Client and login, details on this step can be found in
Stage 4. Once you have connected, you need to navigate to where the "WebsiteTemplateA.css" is located:-
"www/styles//", so in this example I would navigate to
"www/styles/
tdautos.co.uk/"
Now drag this file to your Desktop, and open it up in Notepad (Windows) or TexEditor (Mac OS X). Somewhere near the top of the text file you should see the text "body{", on the line below it should see the words "background-color:#ffffff;". After the colon replace the '#ffffff' with the colour you wish to use as the background. All colours on the web are saved in a hexadecimal format, but you still can reference a limit range of colours by using just words alone. So for example, black in hexadecimal is "#000000" or you can use the word "black":-
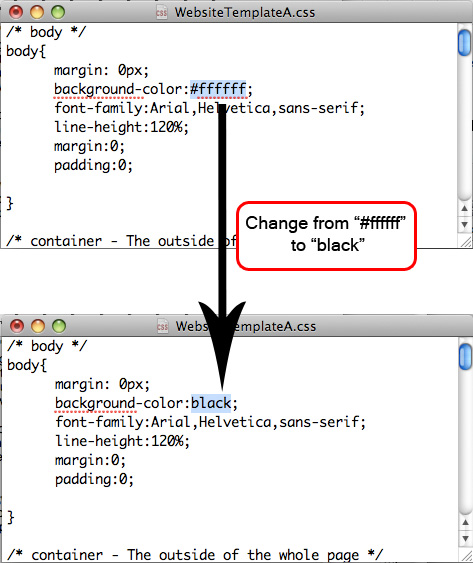
Now save this file and drag it back into your FTP Program and replace the CSS file which is saved onto the web server.
After any changes to a cascading style sheet you must test these changes, see
Stage 5.
Now that you have got your clients design complete you can starting adding the content.
Stage4: Adding Content
The final step is to create the different pages required for your customer and their menu items.
How to add a page How to add a menu item How to add a gallery (coming soon)
How to add a product (coming soon)
How to add a page
Login into your client website, from your Franchisee Control Panel. Once you have clicked on "Administrate" you'll be taken to the main menu for this website:-
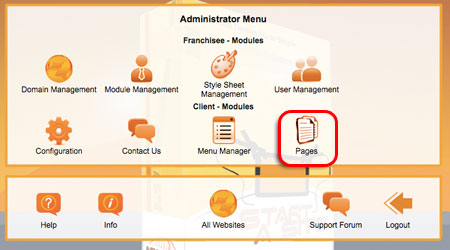
Click on the icon that reads "Pages", and you will be shown the current pages which are hosted on this website:-
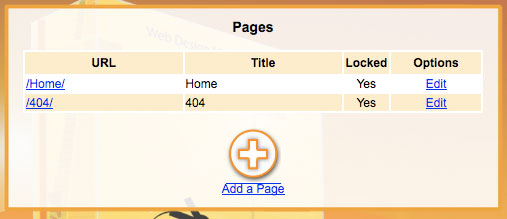
To add a new page, click on the icon at the bottom "Add a Page"

One this page you are required to fill the following fields:- URL, Title & Body...
 URL
URL - The will be what the visitor/search engine will type in to get to this page, this is why you should try it relevant to the content of this page
Title - The title is similar to the URL, in the respect that you visitors will read it as well as search engine, so again keep it relevant.
Body - This is the main part of the page, you can use the editor to create the perfect page.
Locked- If you have the right permissions, you can lock it a page so it can be deleted. So pages by default are "Locked" this is because these are key pages within Start A Site.
Once you are happy click on the button "Add Page"
Now you should see your newly created page within the Pages list. It is possible to update already exisiting pages by clicking on the "Edit" link next to them, and you can delete unlocked pages by clicking the "Delete" link.
How to add a menu item
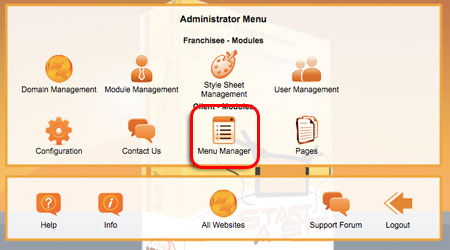
Once you have added a few pages, you now need to create a menu button linking to each page. Within StartASite this easy to do. Once again like adding a page, ensure you are logged into your franchise control panel and have clicked on the link "Administrate" next to the website you are wanting to add a menu item to. From the menu page click on the icon "Menu Manager":-
Next you should see a page similar to the following:-
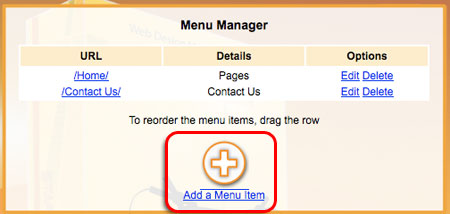
To add a menu item click on the "Add a Menu Item" icon at the bottom. On the next screen you can add a menu item, there are few fields which are required, these are:- Menu Text, Link to & Target
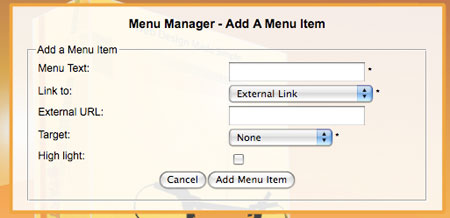 Menu Text
 - The text that will be be displayed for this menu item, keep it short and sweet
Link To - Where do you want this menu item to be linked to, a page within StartASite or an External Link
External URL - If you have selected "External Link" from the "Link To" drop down menu, enter it here
Target - If you want to make this menu item open up in a new windows, select "_Blank (pop up)", if not just leave it as "None"
Once you are finished, click on "Add Menu Item"
Each menu item can be edited or deleted via the links on the Menu Manager screen. In addition to this the menu items can be reordered, this can be done by just dragging the menu items into the order you wish.
(Old Sequence, keep for ref.)
We will guide you every stage of setting up domain name and email addresses.
Below is a detailed list of what is required in the building of every website in 'Startasite'.
Initial meeting with client.
This usually lasts around 1 hour. During which we record the session on a digital voice recorder to capture word for word the clients instructions as to the look and content of the site.
This voice file along with any content (i.e. typed or handwritten instructions) photos, (can be on a C.D., DVD, memory pen, memory card) is then given to one of our skilled designers to start developing the site.
Choose domain name.
Fill in standing order form.
Register domain name.
Design in Photoshop (PSD)
Photocopy of covering letter and standing order form.
File above.
Send off standing order form to clients bank.
Cut PSD using existing CSS
Install 'Startasite'
Show client.
Approve.
Obtain 'Meta description' and 'Meta Keywords' from client.
Enter and submit above.
In 'Users' create admin account for client - email client their CTM log in details.
(Client once given these only has access to 'Contact Us' section and 'Pages Static')
On server control panel in (Cpanel / WHM) create new email account (s) for client and email client log in username and password.
Once email account has been set up on server go into contact us in admin and enter same email address (usually info@domainname.co.uk) in the email field - this will direct traffic from the contact us page to the newly created webmail account.
Record passwords in Excel sheet.
Regular back up of site.
Monthly statement sent out to client. (Detailing Vat etc).
Many more details to follow shortly.